準備工作:
1.若沒有Google Account,請先申請一個
2.申請完成,請至
Google Developers Console
3.(Optional)建議可先至帳戶設定
,將格式改為
台灣,當然如果你在台灣以外的國家請自行選擇
4.在專案選項內,選 "
建立專案",名稱請自取,我這邊取名為StreamingTest
5.至"API和驗證"下選擇API,先將
YouTube Data API v3 啟用
6.選擇"
憑證","
建立新的用戶端ID",在新對話方塊選擇"
已安裝的應用程式"(桌上型應用程式),完成後會在畫面上看到
用戶端ID(client ID及
用戶端密碼(client secret),這兩個在之後的
授權驗證會需要用到,要開始寫程式前的前置工作大致完成
7.在開始用程式建立一個可將自己的Live Stream發佈至Youtube前,也可以先至
現場直播中心,完整的建立一次現場直播流程後,會更容易了解程式中的流程
8.若完全沒使用過Youtube API,強烈建議先下載
youtube-api-samples,
若有興趣可以先看一看這部教學影片
YouTube Developers Live: Setting up your Java IDE for Google API samples,這部影片是針對 sample code做講解,裡面的sample code使用 Maven做專案資源的下載,若想了解Maven請自行google,所以若Eclipes沒有整合Maven,也可以先在Eclipse Marketplace打Maven後便可以找到Maven整合Eclipse的安裝程式
開始開發工作:
1.我的開發工具是Java,所以我選擇sample code內Java底下的youtube-cmdline-createbroadcast-sample Project來測試實作
2.選擇 File->Import->Maven->Existing Maven Project
3.選擇youtube-cmdline-createbroadcast-sample Project的實際存放路徑後,在下方可以看到可選擇的pom.xml檔,勾選後按下Finish,Maven便會根據 pom.xml檔案將所需要的 lib資源從網路下載下來,毋須在自己去找專案相依的那些jar檔
4.完成下載後,我們的Maven Dependencies應該有如下的jar檔
5.完整source code
/*
Source code here
6.程式流程的
第一件事情:應用程式的授權認證,這邊就必須使用到我們在準備工作所提到的
用戶端ID與
用戶端密碼 ,假設各位已經在準備工作中取得授權的這兩樣東西,那麼請打開在src/main/resources底下的client_secrets.json檔案,分別將取到的ID與 密碼貼到對應的json欄位;下方的程式碼就可以透過這組ID與密碼,以及scopes等授權你的應用程式去對你在youtube account下不管是Channel或是LiveBroadCast(線上live頻道)做變動或讀取 ;
// Scope required to wrie data to YouTube.
  List<String> scopes = Lists
    .newArrayList("https://www.googleapis.com/auth/youtube");

  try {
// Authorization. 取得授權的憑證物件後,傳入新建立的youtube物件
Credential credential = authorize(scopes);

   // YouTube object used to make all API requests.
   youtube = new YouTube.Builder(HTTP_TRANSPORT, JSON_FACTORY,
     credential).setApplicationName(
     "youtube-cmdline-createbroadcast-sample").build();
7.授權完成後,
開始建立一個LiveBroadcast物件,此物件可以想像成是一個線上廣播電台,需要有廣播電台名稱,以及開始時間,結束時間,電台的狀態等。相關屬性都設定好後,透過YouTube.LiveBroadcasts.Insert 類別insert,在這邊對insert method傳入的參數有兩個,part及 broadcast 物件,part 是指定要寫入的broadcast property,這邊指定寫入"snippet,status"兩個屬性,broadcast物件就是要建立的broadcast本體。
想了解更多關於此物件的相關屬性或使用方式,請參考
LiveBroadcast API,同樣的,若想查詢其他物件的API,也可以在上方的查詢列打入物件名稱找尋
String title = getBroadcastTitle();
   System.out.println("You chose " + title + " for broadcast title.");

   // Create a snippet with title, scheduled start and end times.
   LiveBroadcastSnippet broadcastSnippet = new LiveBroadcastSnippet();
   broadcastSnippet.setTitle(title);

   broadcastSnippet.setPublishedAt(new DateTime(
     "2014-10-07T16:30:00.000+08:00"));
   broadcastSnippet.setScheduledStartTime(new DateTime(
     "2014-10-07T16:30:00.000+08:00"));
   broadcastSnippet.setScheduledEndTime(new DateTime(
     "2014-10-07T18:00:00.000+08:00"));

   // Create LiveBroadcastStatus with pubic status.
   LiveBroadcastStatus status = new LiveBroadcastStatus();
   status.setPrivacyStatus("public");

   LiveBroadcast broadcast = new LiveBroadcast();
   broadcast.setKind("youtube#liveBroadcast");
   broadcast.setSnippet(broadcastSnippet);
   broadcast.setStatus(status);

   // Create the insert request
   YouTube.LiveBroadcasts.Insert liveBroadcastInsert = youtube
     .liveBroadcasts().insert("snippet,status", broadcast);

   // Request is executed and inserted broadcast is returned
   LiveBroadcast returnedBroadcast = liveBroadcastInsert.execute();

   // Print out returned results.
   System.out
     .println("\n================== Returned Broadcast ==================\n");
   System.out.println("  - Id: " + returnedBroadcast.getId());
   System.out.println("  - Title: "
     + returnedBroadcast.getSnippet().getTitle());
   System.out.println("  - Description: "
     + returnedBroadcast.getSnippet().getDescription());
   System.out.println("  - Published At: "
     + returnedBroadcast.getSnippet().getPublishedAt());
   System.out.println("  - Scheduled Start Time: "
     + returnedBroadcast.getSnippet().getScheduledStartTime());
   System.out.println("  - Scheduled End Time: "
     + returnedBroadcast.getSnippet().getScheduledEndTime());
8.電台建立好後,準備建立電台的廣播通道,也就是LiveStream物件,有這個通道,才能接收Live訊號流進來。建立方式如下程式碼:
// Get the user's selected title for stream.
   title = getStreamTitle();
   System.out.println("You chose " + title + " for stream title.");

   // Create a snippet with title.
   LiveStreamSnippet streamSnippet = new LiveStreamSnippet();
   streamSnippet.setTitle(title);

   LiveStreamCdnIngestionInfo ingestionInfo = new LiveStreamCdnIngestionInfo();
   ingestionInfo.setStreamName("Education2");
   //此Rtmp位址為固定,不需改變
   //Youtube提供給我們打入Stream訊號的Rtmp Server
   ingestionInfo
     .setIngestionAddress("rtmp://a.rtmp.youtube.com/live2");

   // Create content distribution network with format and ingestion
   // type.
   LiveStreamCdn cdn = new LiveStreamCdn();
   cdn.setFormat("720p");
   cdn.setIngestionType("rtmp");
   cdn.setIngestionInfo(ingestionInfo);

   LiveStream stream = new LiveStream();
   stream.setKind("youtube#liveStream");
   stream.setSnippet(streamSnippet);
   stream.setCdn(cdn);

   // Create the insert request
   YouTube.LiveStreams.Insert liveStreamInsert = youtube.liveStreams()
     .insert("snippet,cdn", stream);

   // Request is executed and inserted stream is returned
   LiveStream returnedStream = liveStreamInsert.execute();

   // Print out returned results.
   returnedStream.getCdn().getIngestionInfo().getStreamName();
   System.out
     .println("\n================== Returned Stream ==================\n");
   System.out.println("  - Id: " + returnedStream.getId());
   System.out.println("  - Title: "
     + returnedStream.getSnippet().getTitle());
   System.out.println("  - Description: "
     + returnedStream.getSnippet().getDescription());
   System.out.println("  - Published At: "
     + returnedStream.getSnippet().getPublishedAt());
   System.out.println("  - Stream Name: "
     + returnedStream.getCdn().getIngestionInfo()
       .getStreamName());
   System.out.println("  - Stream Address: "
     + returnedStream.getCdn().getIngestionInfo()
       .getIngestionAddress());
9.將前面所建立的broadcast物件與stream物件做綁定,一個broadcast只能有一個stream來源,而一個stream可以做為多個broadcast的來源,綁定的程式碼如下:
// Create the bind request
   YouTube.LiveBroadcasts.Bind liveBroadcastBind = youtube
     .liveBroadcasts().bind(returnedBroadcast.getId(),
       "id,contentDetails");

   // Set stream id to bind
   liveBroadcastBind.setStreamId(returnedStream.getId());

   // Request is executed and bound broadcast is returned
   returnedBroadcast = liveBroadcastBind.execute();

   // Print out returned results.
   System.out
     .println("\n================== Returned Bound Broadcast ==================\n");
   System.out
     .println("  - Broadcast Id: " + returnedBroadcast.getId());
   System.out.println("  - Bound Stream Id: "
     + returnedBroadcast.getContentDetails().getBoundStreamId());
10. 現在萬事皆備,只欠東風,相信現在的疑問就是:如何將我們的Live Stream流打至Youtube上,方法理論上應該只有一種,就是
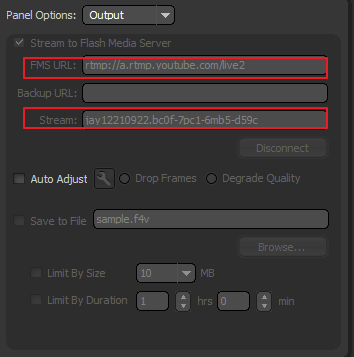
將我們Live Encoder的FMS(Flash Media Server)設成剛剛在程式中指定的rtmp://a.rtmp.youtube.com/live2 ,同時在 Live Encoder能夠設定 Stream Name的地方,設定Youtube回傳給我們的 stream物件的streamName,這兩點很重要,下面先列出我程式執行結果以方便說明:
Please enter a broadcast title: test1
You chose test1 for broadcast title.
================== Returned Broadcast ==================
- Id: NqtWlfFOQb8
- Title: test1
- Description:
- Published At: 2014-10-07T08:33:34.000Z
- Scheduled Start Time: 2014-10-07T08:30:00.000Z
- Scheduled End Time: 2014-10-07T10:00:00.000Z
Please enter a stream title: stream4
You chose stream4 for stream title.
================== Returned Stream ==================
- Id: h5jJg5xHAzn4jSSf46IGcA1412670820085418
- Title: stream4
- Description:
- Published At: 2014-10-07T08:33:40.000Z
-
Stream Name: jay12210922.bc0f-7pc1-6mb5-d59c =>提供給Live Encoder去設定StreamName
-
Stream Address: rtmp://a.rtmp.youtube.com/live2 =>提供給Live Encoer去設定FMS
透過從youtube回傳的stream物件,去設定我們使用的Live Encoder,這裡我所使用的Live Encoder為
Adobe Flash Media Live Encoder 3.2,若沒有可以先去下載,若想模擬live stream,可使用
ManyCam,下載下來安裝完,播放影片,就會直接被Adobe 的Live Encoder偵測到,產生live stream訊號。下圖附上我在Live Encoder的設定:
設定完成後,在下方按下Start,正常情況下會看到左下方的Streaming to Primary...,到這裡已經完成了將我們local端的stream流送至youtube的設定,底下再來看看youtube是否真的已經接收到stream流訊號
11.在程式的最後埋入不斷去偵測我們在youtube所建立的liveStream的狀態,當liveStream還沒收到任何訊號時,狀態會顯示ready,程式中是每隔五秒去偵測一次狀態是否改變為active,若改變為active,我們就知道liveStream物件已經收到訊號流了,此時可以開始測試我們的broadcast了。底下列出程式碼:
YouTube.LiveStreams.List liveStreamRequest = youtube
     .liveStreams()
     .list("id,status")
     .setId(returnedBroadcast.getContentDetails()
       .getBoundStreamId());

   LiveStreamList returnedList = liveStreamRequest.execute();
   List<LiveStream> liveStreams = returnedList.getItems();
   if (liveStreams != null && liveStreams.size() > 0) {
    LiveStream liveStream = liveStreams.get(0);

    while (!liveStream.getStatus().getStreamStatus()
      .equals("active")) {
     Thread.sleep(5000);
     returnedList = liveStreamRequest.execute();
     liveStreams = returnedList.getItems();
     liveStream = liveStreams.get(0);
    }
    //the broadcast cann't transition the status from ready to live directly,
    //it must change to testing first and then live.
    YouTube.LiveBroadcasts.Transition broadCastRequest = youtube
      .liveBroadcasts().transition("testing",
        returnedBroadcast.getId(), "id,contentDetails,status");

    LiveBroadcast liveBroadCast = broadCastRequest.execute();
    String youTubeLink = "https://www.youtube.com/watch?v="+liveBroadCast.getId();
    System.out.println("youTubeLink:"+youTubeLink);
    System.out.println("Broad EmbedHtml:"+liveBroadCast.getContentDetails().getMonitorStream().getEmbedHtml());
    System.out.println("Broad Cast Status:"+liveBroadCast.getStatus().getLifeCycleStatus());
   }
這裡再提示一點,要可以看到broadcast的內容,必須在broadcast的status為
testing及
live的時候,因此程式碼透過
YouTube.LiveBroadcasts.Transition 去改變broadcast物件的狀態為testing,就是表示我們要開始測試這各廣播電台的stream通道是否有正常收到訊號;當testing沒問題時,要正式讓所有人都可以在youtube上看到我們的live broadcast內容時,只需再將broadcast的狀態改為live即可,我這邊的程式碼並沒有包含將狀態改為live,請各位自行動手實作。
下面附上狀態改變完,接收到的broadcast結果:
================== Returned Bound Broadcast ==================
- Broadcast Id: NqtWlfFOQb8
- Bound Stream Id: h5jJg5xHAzn4jSSf46IGcA1412670820085418
youTubeLink:https://www.youtube.com/watch?v=NqtWlfFOQb8
=> 產生出來可在youtube上看live 轉播的網址
Broad EmbedHtml:<iframe width="425" height="344" src="http://www.youtube.com/embed/NqtWlfFOQb8?autoplay=1&livemonitor=1" frameborder="0" allowfullscreen></iframe>
=> 若要嵌入至某個網頁,則使用此html語法
Broad Cast Status:testStarting
最後附上一些參考的文件或網站,若還是有問題都可以多方參考,畢竟本人又是第一次做這個功能,一定有許多未發現的功能等著大家自行去探索!
我研究旅途的起點,看一些基本觀念跟追蹤資訊的入口
重要的API參考入口網址,裡面有"try it"的地方都可以試著去執行他,經過這個階段可以更了解該API各參數的功用以及回傳的結果
了解Broadcast的生命週期,就更清楚如何去建立、控制Broadcast、改變Broadcast的狀態
live Encoder 的設定參數
若使用node.js的人,可以參考此篇實作


