2015年10月16日 星期五

如何使用oAuth2.0 整合至 Web Application(using Google Youtube Data API v3)

前言:
   去年有寫一篇 如何將live stream發佈至至YouTube,該篇其實已經有使用到oAuth2.0的授權認證機制,但該篇寫法僅適用於單機版本的應用程式,若想在Web Application整合oAuth2.0授權驗證機制,那麼便需要另一種作法,該作法是此篇要講述的重點,若完全沒有操作過YouTube Data API的人建議先看過該篇,因為有些前面講過的設定在這邊就不再贅述。

   由於Google APIs是利用oAuth2.0來對user做驗證與授權,因此在開始進入本篇的重點之前,要先確保大家都了解何謂oAuth2.0。
oAuth2.0用最簡單白話的舉例來解釋,就是當我們的Web Application要提供user操作管理該名user在Youtube的影音服務時,我們的Web Application必須先取得該名user在Google平台上對我們Web Application的授權,因此需執行以下的流程:
  1.驗證user的身分:在後面的實作會將user導到Google的user登入驗證頁面,通過驗證後,會詢問user是否同意授權我們的應用程式管理user的Youtube。
  2.取得user的授權後,我們的Web Application才能開始針對user的Youtube做管理操作(在這邊的範例我們要將影音上傳至user在youtube上的頻道。
整個oAuth2.0就是一個驗證+授權的一連串流程整合在一起的機制,更詳盡的圖文說明請參考
Using OAuth 2.0 to Access Google APIs


準備工作:
1.請先準備好一組OAuth2.0使用的憑證(Credential),若沒有憑證,請至Google Developers Console,然後如下圖:

新增OAuth2.0的憑證,進去後我是選擇"其他",理論上應該選擇"網路應用程式",但我想應該是都可以,各位自行試試看,重點是建立成功後所取得的 用戶端ID用戶端密碼 ,這兩個值很重要,在之後的程式碼中會再使用到,請先記得有這件事情。
2.環境的準備:我的開發環境是 Eclipse 4.5 (Kepler),Tomcat7.0,JDK1.6,同時是使用Spring+Struts2+hibernate,這裡ssh不是重點,只有使用servlet也沒問題,各位只要使用習慣熟悉的環境即可
3.相關Library的準備:一種比較快的方式是利用Google Plugin的工具來下載相關的Google API Lib,而在使用Google Plugin之前必須先安裝此Google Plugin,安裝方式如後:在Eclipse的選單選擇 Help>>Installed New Softwares,然後參考此頁貼入Direct plugin link work with 中,將Google plugin 打勾,要看詳細的圖文說明可參考 Google Plugin for Eclipse
另一種取得Google APIs Lib的方式是直接在 Supported Google APIs 找到我們要的 API項目,這裡我們要下載的是 YouTube Data API v3。
4.假設各位已經取得所需的YouTube Data API Lib,請將取得的jar檔加入到WEB-INF/lib底下,各位的lib底下應該最少要有下面這些jar檔:
  • google-api-client-1.20.0.jar
  • google-api-client-servlet-1.20.0.jar
  • google-oauth-client-1.20.0.jar
  • google-oauth-client-servlet-1.20.0.jar
  • google-http-client-1.20.0.jar
  • commons-logging-1.1.1.jar
  • gson-2.1.jar
  • httpclient-4.0.1.jar
  • httpcore-4.0.1.jar
  • jackson-core-asl-1.9.11.jar
  • jackson-core-2.1.3.jar
  • jdo2-api-2.3-eb.jar
  • jsr305-1.3.9.jar
  • protobuf-java-2.4.1.jar
  • transaction-api-1.1.jar
  • xpp3-1.1.4c.jar (我的裡面沒有)
基本上不論你是用 Google Plugin的工具取得lib,還是自行下載,按照Setup Instructions裡所列,你應該要有如上的jar檔,但其實我是用Google Plugin工具取得,並沒有最後一個xpp3-1.1.4c.jar檔,一樣可以運作,因此如果各位跟我一樣,那麼應該是沒有關係的。


開始程式實作與設定
1. Authorization Servlet的實作: 在這裡我們必須新增兩支Servlet分別去繼承 AbstractAuthorizationCodeServletAbstractAuthorizationCodeCallbackServlet 並且覆寫其中特定的方法,讓我們的Web Application可以很容易的跟Google的身分驗證與授權流程串接起來,source code 如下:

package com.gorilla.servlet;

import java.io.File;
import java.io.IOException;
import java.util.ArrayList;
import java.util.List;

import javax.servlet.RequestDispatcher;
import javax.servlet.ServletException;
import javax.servlet.http.HttpServletRequest;
import javax.servlet.http.HttpServletResponse;

import com.google.api.client.auth.oauth2.AuthorizationCodeFlow;
import com.google.api.client.auth.oauth2.AuthorizationCodeRequestUrl;
import com.google.api.client.auth.oauth2.BearerToken;
import com.google.api.client.auth.oauth2.Credential;
import com.google.api.client.auth.oauth2.StoredCredential;
import com.google.api.client.extensions.servlet.auth.oauth2.AbstractAuthorizationCodeServlet;
import com.google.api.client.googleapis.auth.oauth2.GoogleAuthorizationCodeFlow;
import com.google.api.client.http.BasicAuthentication;
import com.google.api.client.http.GenericUrl;
import com.google.api.client.http.javanet.NetHttpTransport;
import com.google.api.client.json.jackson2.JacksonFactory;
import com.google.api.client.util.store.DataStore;
import com.google.api.client.util.store.FileDataStoreFactory;

public class ServletSample extends AbstractAuthorizationCodeServlet {
 public static AuthorizationCodeFlow flow;

 @Override
 public void doGet(HttpServletRequest req, HttpServletResponse response) throws IOException {
   Credential credential = this.getCredential();
if (credential != null) {
 if (credential.getExpiresInSeconds() < 0)
 //if the accessToken expired, refresh the accessToken using refreshToken
   if (credential.refreshToken()){
  System.out.println("refresh the access token's expired date=" + new Date(credential.getExpirationTimeMilliseconds()));
    }
   req.getSession().setAttribute("credential", this.getCredential());
   StringBuffer sb = new StringBuffer();
   sb.append("http://").append(req.getLocalAddr() + ":" + req.getLocalPort()).append(req.getContextPath())
     .append("/showContents.html");
   try {
    response.sendRedirect(sb.toString());
   } catch (IOException e) {
    // TODO Auto-generated catch block
    e.printStackTrace();
   }
  }
  
 }

 @Override
 protected String getRedirectUri(HttpServletRequest req) throws ServletException, IOException {
  // TODO Auto-generated method stub
  StringBuilder sb = new StringBuilder();
  sb.append("http://").append(req.getLocalAddr() + ":" + req.getLocalPort()).append(req.getContextPath())
    .append("/oauth2callback");
  String redirectUri = sb.toString();
  return redirectUri;
 }

 @Override
 protected String getUserId(HttpServletRequest req) throws ServletException, IOException {
  // TODO Auto-generated method stub

  return "root";
 }

 @Override
 protected AuthorizationCodeFlow initializeFlow() throws ServletException, IOException {
  // TODO Auto-generated method stub
  
  String clientID = "xxxxxxxxxxxxxxxx-4hncs25gkhehaqhqqcsnirlli3p6p4i8.apps.googleusercontent.com";
  String password = "meXotHAj2Pa46r0azuzKIAHI";
  List scopes = new ArrayList();
  scopes.add("https://www.googleapis.com/auth/youtube");
  String CREDENTIALS_DIRECTORY = ".oauth-credentials";

  File file = new File(System.getProperty("user.home") + "/" + CREDENTIALS_DIRECTORY);
 
  FileDataStoreFactory fileDataStoreFactory = new FileDataStoreFactory(file);
  DataStore datastore = fileDataStoreFactory.getDataStore("youtube");
 
 flow = new GoogleAuthorizationCodeFlow.Builder(
          new NetHttpTransport(), JacksonFactory.getDefaultInstance(),
          clientID, password,
          scopes).setDataStoreFactory(
           fileDataStoreFactory).setAccessType("offline").build();
  
  return flow;

 }

 @Override
 protected void onAuthorization(javax.servlet.http.HttpServletRequest req,
   javax.servlet.http.HttpServletResponse resp, AuthorizationCodeRequestUrl authorizationUrl)
     throws javax.servlet.ServletException, IOException {

  Credential credential = flow.loadCredential("root");
  if (credential != null) {
   StringBuilder sb = new StringBuilder();
   sb.append("http://").append(req.getLocalAddr() + ":" + req.getLocalPort()).append(req.getContextPath())
     .append("/showContents.html");
   req.getSession().setAttribute("credential", credential);
  } else {
   super.onAuthorization(req, resp, authorizationUrl);
  }
 }

}

底下將整個身分驗證流程在程式中的執行順序以及個人認為使用method的重點敘述如下:
1.getUserId: 在沒有做過任何身分驗證時,會從ServletSample(繼承AbstractAuthorizationCodeServlet)的getUserId() method開始, 因為我的應用程式只需要一個使用者來操作youtube API,因此在我的程式中我的getUserId始終是return "root",這邊應是要看個人應用程式的需求而定。
2. initializeFlow: 這個method最主要的目的就是產生授權流程物件,如程式碼中的靜態變數flow。在這邊我們需要找一個實體位置用來存放flow對應的Credential(憑證),存放Credential的用意是當使用者已經授權認證過後,該憑證資訊會存放在我們設定的實體位置,如此我們的Web Application在每次要執行使用者的授權驗證前,會先去該實體路徑檢查是否有特定使用者的授權憑證資訊,若有,則不需要再連結到Google去重新執行身分認證流程。 在產生flow物件時,就需要用到我們前面提到的 用戶端ID用戶端密碼,如下面程式碼:
String clientID = "xxxxxxxxxxxx8-qpil7lurqnjvho7qphh5tfj3tru7vl3a.apps.googleusercontent.com";
  String password = "_WJYpeI_d09UxNPkAxxxxxx";
  List scopes = new ArrayList();
  scopes.add("https://www.googleapis.com/auth/youtube");
  String CREDENTIALS_DIRECTORY = ".oauth-credentials";
  //credential 資訊要存放的目錄
  File file = new File(System.getProperty("user.home") + "/" + CREDENTIALS_DIRECTORY);
  
  FileDataStoreFactory fileDataStoreFactory = new FileDataStoreFactory(file);
  DataStore datastore = fileDataStoreFactory.getDataStore("youtube");
 

 flow = new GoogleAuthorizationCodeFlow.Builder(
          new NetHttpTransport(), JacksonFactory.getDefaultInstance(),
          clientID, password,
          scopes).setDataStoreFactory(
           fileDataStoreFactory).setAccessType("offline").build();
   return flow;
這邊注意要使用 GoogleAuthorizationCodeFlow來建立flow,並且設定accessTypeoffline,如此才有
refresh token可以更新access token,access token的存續期只有1小時,因此我在doGet()會特別去判定
access token是否過去,若過去須執行token的更新,如第7點的程式內容


3.getRedirectUri:取得AuthorizationCodeFlow物件後,要設定當使用者通過Google的身分
驗證後,系統會將使用者重新導向到哪一個頁面,底下看一下我web.xml的設定:
<servlet>
        <servlet-name>oauth2callback</servlet-name>
        <servlet-class>com.gorilla.servlet.AuthorizationCodeCallbackServlet</servlet-class>
        <load-on-startup>1</load-on-startup>
   </servlet>

    <servlet-mapping>
        <servlet-name>oauth2callback</servlet-name>
        <url-pattern>/oauth2callback</url-pattern>
    </servlet-mapping>
   
我的AuthorizationCodeCallbackServlet是(必須)繼承上面所提到的AbstractAuthorizationCodeCallbackServlet,因此我的getRedirectUri()必須有如下的code:
sb.append("http://").append("127.0.0.1:" + req.getLocalPort()).append(req.getContextPath())
  .append("/oauth2callback");
同時這邊要提醒,在你的GoogleDeveloperConsole的憑證畫面裡,也必須有如下的設定: 也就是你getRedirectUri 所return 的URL必須與你在console內設定的一致。 4.onAuthorization:這個method主要就是用來判斷AuthorizationCodeFlow物件是否能取得Credential物件,若能,則無須經過Google的身分認證流程,否則則進入Google的身分認證流程。當第一次執行程式時,一定取不到Credentail物件,則會進入如下的畫面: 5.若Google驗證程序成功,則流程會執行回呼Servlet,也就是在流程3提到的AuthorizationCodeCallbackServlet,首先會去執行它的initializeFlow(),這裡很重要的一點: 這個method回傳的AuthorizationCodeFlow物件是參考到ServletSample.flow物件,若不這樣參考,是取不到正確的Credential物件,程式如下:
@Override
protected AuthorizationCodeFlow initializeFlow() throws ServletException, IOException {
  // TODO Auto-generated method stub
  return ServletSample.flow;
 }
底下列出完整的AuthorizationCodeCallbackServlet程式碼:
package com.gorilla.servlet;

import java.io.File;
import java.io.IOException;
import java.util.ArrayList;
import java.util.List;

import javax.servlet.ServletException;
import javax.servlet.http.HttpServletRequest;
import javax.servlet.http.HttpServletResponse;

import com.google.api.client.auth.oauth2.AuthorizationCodeFlow;
import com.google.api.client.auth.oauth2.AuthorizationCodeResponseUrl;
import com.google.api.client.auth.oauth2.Credential;
import com.google.api.client.auth.oauth2.StoredCredential;
import com.google.api.client.extensions.servlet.auth.oauth2.AbstractAuthorizationCodeCallbackServlet;
import com.google.api.client.googleapis.auth.oauth2.GoogleAuthorizationCodeFlow;
import com.google.api.client.http.javanet.NetHttpTransport;
import com.google.api.client.json.jackson2.JacksonFactory;
import com.google.api.client.util.store.DataStore;
import com.google.api.client.util.store.FileDataStoreFactory;

public class AuthorizationCodeCallbackServlet extends AbstractAuthorizationCodeCallbackServlet {
 private static String firstPage = "" ;

@Override
protected void onSuccess(HttpServletRequest req, HttpServletResponse resp, Credential credential)
   throws ServletException, IOException {
  StringBuilder sb = new StringBuilder();
  
  sb.append("http://").append(req.getLocalAddr() + ":" + req.getLocalPort()).append(req.getContextPath())
    .append("/showContents.html");
  req.getSession().setAttribute("credential", credential);
  resp.sendRedirect(sb.toString());
 }

 
@Override
protected String getRedirectUri(HttpServletRequest req) throws ServletException, IOException {
  // TODO Auto-generated method stub
  StringBuilder sb = new StringBuilder();

  
  sb.append("http://").append("127.0.0.1:" + req.getLocalPort()).append(req.getContextPath())
  .append("/oauth2callback");
  
  String redirectUri = sb.toString();

  return redirectUri;
 }
 

@Override
protected String getUserId(HttpServletRequest req) throws ServletException, IOException {
  // TODO Auto-generated method stub
  return "root";
 }


@Override
protected void onError(HttpServletRequest req, HttpServletResponse resp, AuthorizationCodeResponseUrl errorResponse)
   throws ServletException, IOException {
  // handle error

  String error = errorResponse.getError();
  System.out.println(error);
 }

 
@Override
protected AuthorizationCodeFlow initializeFlow() throws ServletException, IOException {
  // TODO Auto-generated method stub
  return ServletSample.flow;
 }

}

6.接下來會再跑至getRedirectUri與getUserId等method,最後跑至onSuccess method,在這個method我先將Credential物件存至session中,再redirect至顯示youtube平台影音list的頁面,程式如下:
@Override
protected void onSuccess(HttpServletRequest req, HttpServletResponse resp, Credential credential)  throws ServletException, IOException {
  StringBuilder sb = new StringBuilder();
  
       sb.append("http://").append(req.getLocalAddr() + ":" + req.getLocalPort()).append(req.getContextPath()).append("/showContents.html");
  req.getSession().setAttribute("credential", credential);
  resp.sendRedirect(sb.toString());
 }
7.以上,基本上到第六點完成,就已經完成使用者第一次登入驗證的完整流程,接下來當你在執行同樣的程式,以我的程式來說,我只要輸入http://localhost:8080/ExMedia/authorize,又會再度進入驗證流程,但因為已經有執行過Google的身分驗證流程,且Credential資訊已經寫入指定的實體位置,因此再度執行時,會直接跳過SampleServlet 流程1~6的step,直接進入doGet ,如下列程式碼 :
@Override
public void doGet(HttpServletRequest req, HttpServletResponse response) throws IOException {
  Credential credential = this.getCredential();
  if (credential != null) {
 if (credential.getExpiresInSeconds() < 0)
   //if the accessToken expired, refresh the accessToken using refreshToken
    if (credential.refreshToken()){
  System.out.println("refresh the access token's expired date=" + new Date(credential.getExpirationTimeMilliseconds()));
    }
     
 req.getSession().setAttribute("credential", this.getCredential());
   
 StringBuffer sb = new StringBuffer();
 sb.append("http://").append(req.getLocalAddr() + ":" + req.getLocalPort()).append(req.getContextPath()).append("/showContents.html");
  try {
   response.sendRedirect(sb.toString());
  } catch (IOException e) {
   // TODO Auto-generated catch block
   e.printStackTrace();
  }
   }
}
備註:
  • Servie Account 無法與YouTube Data API 做整合(本文實作時原本就是想以Service Account來與YouTube Data API做整合)
  • 相關可參考的資源與文獻:

    2014年10月30日 星期四

    Loop Object 's Key/Value in Javascript

    Sample Code 1:
    for(var key in WP.LiveStream){
        if (WP.LiveStream.hasOwnProperty(key)) {
         sb.append(key +"="+ WP.LiveStream[key]);
         sb.append(";");
        }
    }
    
    hasOwnProperty:是用來檢查Loop物件是否真的有該屬性,還是該屬性是屬於Loop物件從prototype繼承下來的屬性(或function)


    Sample Code 2:
    var user = {};
    function setUsers(data) {
        for (var k in data) {
            if (data.hasOwnProperty(k)) {
               user[k] = data[k];
            }
        }
    }
    

    透過此種設定 Object的方式,只要兩物件的屬性相同,幾行程式碼就可以搞定擁有
    許多屬性的A object -> B object 的物件設定


    Sample Code 3:
    for (var k in target){
        if (typeof target[k] !== 'function') {
             alert("Key is " + k + ", value is" + target[k]);
        }
    }
    
    透過判別屬性不是function,才輸出


    資料參考來源:stackoverflow
    http://stackoverflow.com/questions/7241878/for-in-loops-in-javascript-key-value-pairs
    http://stackoverflow.com/questions/2958841/how-to-loop-a-key-value-object-in-javascript

    2014年10月7日 星期二

    如何將live stream發佈至YouTube(using YouTube Live Streaming API)

    準備工作:
    1.若沒有Google Account,請先申請一個
    2.申請完成,請至Google Developers Console
    3.(Optional)建議可先至帳戶設定將格式改為 台灣,當然如果你在台灣以外的國家請自行選擇
    4.在專案選項內,選 "建立專案",名稱請自取,我這邊取名為StreamingTest
    5.至"API和驗證"下選擇API,先將YouTube Data API v3 啟用
    6.選擇"憑證","建立新的用戶端ID",在新對話方塊選擇"已安裝的應用程式"(桌上型應用程式),完成後會在畫面上看到 用戶端ID(client ID及用戶端密碼(client secret),這兩個在之後的授權驗證會需要用到,要開始寫程式前的前置工作大致完成
    7.在開始用程式建立一個可將自己的Live Stream發佈至Youtube前,也可以先至現場直播中心,完整的建立一次現場直播流程後,會更容易了解程式中的流程
    8.若完全沒使用過Youtube API,強烈建議先下載  youtube-api-samples
    若有興趣可以先看一看這部教學影片  YouTube Developers Live: Setting up your Java IDE for Google API samples,這部影片是針對 sample code做講解,裡面的sample code使用 Maven做專案資源的下載,若想了解Maven請自行google,所以若Eclipes沒有整合Maven,也可以先在Eclipse Marketplace打Maven後便可以找到Maven整合Eclipse的安裝程式

    開始開發工作:
    1.我的開發工具是Java,所以我選擇sample code內Java底下的youtube-cmdline-createbroadcast-sample Project來測試實作
    2.選擇 File->Import->Maven->Existing Maven Project
    3.選擇youtube-cmdline-createbroadcast-sample Project的實際存放路徑後,在下方可以看到可選擇的pom.xml檔,勾選後按下Finish,Maven便會根據 pom.xml檔案將所需要的 lib資源從網路下載下來,毋須在自己去找專案相依的那些jar檔
    4.完成下載後,我們的Maven Dependencies應該有如下的jar檔

    5.完整source code
    /*
    Source code here
    

    6.程式流程的第一件事情:應用程式的授權認證,這邊就必須使用到我們在準備工作所提到的用戶端ID用戶端密碼 ,假設各位已經在準備工作中取得授權的這兩樣東西,那麼請打開在src/main/resources底下的client_secrets.json檔案,分別將取到的ID與 密碼貼到對應的json欄位;下方的程式碼就可以透過這組ID與密碼,以及scopes等授權你的應用程式去對你在youtube account下不管是Channel或是LiveBroadCast(線上live頻道)做變動或讀取 ;

    // Scope required to wrie data to YouTube.
      List<String> scopes = Lists
        .newArrayList("https://www.googleapis.com/auth/youtube");
    
      try {
    // Authorization. 取得授權的憑證物件後,傳入新建立的youtube物件
    Credential credential = authorize(scopes);
    
       // YouTube object used to make all API requests.
       youtube = new YouTube.Builder(HTTP_TRANSPORT, JSON_FACTORY,
         credential).setApplicationName(
         "youtube-cmdline-createbroadcast-sample").build();
    
    7.授權完成後,開始建立一個LiveBroadcast物件,此物件可以想像成是一個線上廣播電台,需要有廣播電台名稱,以及開始時間,結束時間,電台的狀態等。相關屬性都設定好後,透過YouTube.LiveBroadcasts.Insert 類別insert,在這邊對insert method傳入的參數有兩個,part及 broadcast 物件,part 是指定要寫入的broadcast property,這邊指定寫入"snippet,status"兩個屬性,broadcast物件就是要建立的broadcast本體。
    想了解更多關於此物件的相關屬性或使用方式,請參考LiveBroadcast API,同樣的,若想查詢其他物件的API,也可以在上方的查詢列打入物件名稱找尋
    String title = getBroadcastTitle();
       System.out.println("You chose " + title + " for broadcast title.");
    
       // Create a snippet with title, scheduled start and end times.
       LiveBroadcastSnippet broadcastSnippet = new LiveBroadcastSnippet();
       broadcastSnippet.setTitle(title);
       
       broadcastSnippet.setPublishedAt(new DateTime(
         "2014-10-07T16:30:00.000+08:00"));
       broadcastSnippet.setScheduledStartTime(new DateTime(
         "2014-10-07T16:30:00.000+08:00"));
       broadcastSnippet.setScheduledEndTime(new DateTime(
         "2014-10-07T18:00:00.000+08:00"));
    
       // Create LiveBroadcastStatus with pubic status.
       LiveBroadcastStatus status = new LiveBroadcastStatus();
       status.setPrivacyStatus("public");
    
       LiveBroadcast broadcast = new LiveBroadcast();
       broadcast.setKind("youtube#liveBroadcast");
       broadcast.setSnippet(broadcastSnippet);
       broadcast.setStatus(status);
    
       // Create the insert request
       YouTube.LiveBroadcasts.Insert liveBroadcastInsert = youtube
         .liveBroadcasts().insert("snippet,status", broadcast);
    
       // Request is executed and inserted broadcast is returned
       LiveBroadcast returnedBroadcast = liveBroadcastInsert.execute();
    
       // Print out returned results.
       System.out
         .println("\n================== Returned Broadcast ==================\n");
       System.out.println("  - Id: " + returnedBroadcast.getId());
       System.out.println("  - Title: "
         + returnedBroadcast.getSnippet().getTitle());
       System.out.println("  - Description: "
         + returnedBroadcast.getSnippet().getDescription());
       System.out.println("  - Published At: "
         + returnedBroadcast.getSnippet().getPublishedAt());
       System.out.println("  - Scheduled Start Time: "
         + returnedBroadcast.getSnippet().getScheduledStartTime());
       System.out.println("  - Scheduled End Time: "
         + returnedBroadcast.getSnippet().getScheduledEndTime());
    
    8.電台建立好後,準備建立電台的廣播通道,也就是LiveStream物件,有這個通道,才能接收Live訊號流進來。建立方式如下程式碼:
    // Get the user's selected title for stream.
       title = getStreamTitle();
       System.out.println("You chose " + title + " for stream title.");
    
       // Create a snippet with title.
       LiveStreamSnippet streamSnippet = new LiveStreamSnippet();
       streamSnippet.setTitle(title);
    
       LiveStreamCdnIngestionInfo ingestionInfo = new LiveStreamCdnIngestionInfo();
       ingestionInfo.setStreamName("Education2");
       //此Rtmp位址為固定,不需改變
       //Youtube提供給我們打入Stream訊號的Rtmp Server
       ingestionInfo
         .setIngestionAddress("rtmp://a.rtmp.youtube.com/live2");
    
       // Create content distribution network with format and ingestion
       // type.
       LiveStreamCdn cdn = new LiveStreamCdn();
       cdn.setFormat("720p");
       cdn.setIngestionType("rtmp");
       cdn.setIngestionInfo(ingestionInfo);
    
       LiveStream stream = new LiveStream();
       stream.setKind("youtube#liveStream");
       stream.setSnippet(streamSnippet);
       stream.setCdn(cdn);
    
       // Create the insert request
       YouTube.LiveStreams.Insert liveStreamInsert = youtube.liveStreams()
         .insert("snippet,cdn", stream);
    
       // Request is executed and inserted stream is returned
       LiveStream returnedStream = liveStreamInsert.execute();
    
       // Print out returned results.
       returnedStream.getCdn().getIngestionInfo().getStreamName();
       System.out
         .println("\n================== Returned Stream ==================\n");
       System.out.println("  - Id: " + returnedStream.getId());
       System.out.println("  - Title: "
         + returnedStream.getSnippet().getTitle());
       System.out.println("  - Description: "
         + returnedStream.getSnippet().getDescription());
       System.out.println("  - Published At: "
         + returnedStream.getSnippet().getPublishedAt());
       System.out.println("  - Stream Name: "
         + returnedStream.getCdn().getIngestionInfo()
           .getStreamName());
       System.out.println("  - Stream Address: "
         + returnedStream.getCdn().getIngestionInfo()
           .getIngestionAddress());
    
    9.將前面所建立的broadcast物件與stream物件做綁定,一個broadcast只能有一個stream來源,而一個stream可以做為多個broadcast的來源,綁定的程式碼如下:
    // Create the bind request
       YouTube.LiveBroadcasts.Bind liveBroadcastBind = youtube
         .liveBroadcasts().bind(returnedBroadcast.getId(),
           "id,contentDetails");
    
       // Set stream id to bind
       liveBroadcastBind.setStreamId(returnedStream.getId());
    
       // Request is executed and bound broadcast is returned
       returnedBroadcast = liveBroadcastBind.execute();
    
       // Print out returned results.
       System.out
         .println("\n================== Returned Bound Broadcast ==================\n");
       System.out
         .println("  - Broadcast Id: " + returnedBroadcast.getId());
       System.out.println("  - Bound Stream Id: "
         + returnedBroadcast.getContentDetails().getBoundStreamId());
    
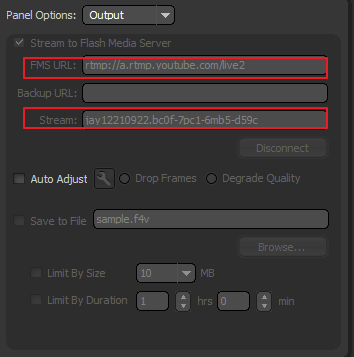
    10. 現在萬事皆備,只欠東風,相信現在的疑問就是:如何將我們的Live Stream流打至Youtube上,方法理論上應該只有一種,就是將我們Live Encoder的FMS(Flash Media Server)設成剛剛在程式中指定的rtmp://a.rtmp.youtube.com/live2 ,同時在  Live Encoder能夠設定 Stream Name的地方,設定Youtube回傳給我們的 stream物件的streamName,這兩點很重要,下面先列出我程式執行結果以方便說明:
    Please enter a broadcast title: test1
    You chose test1 for broadcast title.

    ================== Returned Broadcast ==================

      - Id: NqtWlfFOQb8
      - Title: test1
      - Description:
      - Published At: 2014-10-07T08:33:34.000Z
      - Scheduled Start Time: 2014-10-07T08:30:00.000Z
      - Scheduled End Time: 2014-10-07T10:00:00.000Z
    Please enter a stream title: stream4
    You chose stream4 for stream title.

    ================== Returned Stream ==================

      - Id: h5jJg5xHAzn4jSSf46IGcA1412670820085418
      - Title: stream4
      - Description:
      - Published At: 2014-10-07T08:33:40.000Z
      - Stream Name: jay12210922.bc0f-7pc1-6mb5-d59c =>提供給Live Encoder去設定StreamName
      - Stream Address: rtmp://a.rtmp.youtube.com/live2   =>提供給Live Encoer去設定FMS

    透過從youtube回傳的stream物件,去設定我們使用的Live Encoder,這裡我所使用的Live Encoder為Adobe Flash Media Live Encoder 3.2,若沒有可以先去下載,若想模擬live stream,可使用ManyCam,下載下來安裝完,播放影片,就會直接被Adobe 的Live Encoder偵測到,產生live stream訊號。下圖附上我在Live Encoder的設定:
    設定完成後,在下方按下Start,正常情況下會看到左下方的Streaming to Primary...,到這裡已經完成了將我們local端的stream流送至youtube的設定,底下再來看看youtube是否真的已經接收到stream流訊號

    11.在程式的最後埋入不斷去偵測我們在youtube所建立的liveStream的狀態,當liveStream還沒收到任何訊號時,狀態會顯示ready,程式中是每隔五秒去偵測一次狀態是否改變為active,若改變為active,我們就知道liveStream物件已經收到訊號流了,此時可以開始測試我們的broadcast了。底下列出程式碼:
    YouTube.LiveStreams.List liveStreamRequest = youtube
         .liveStreams()
         .list("id,status")
         .setId(returnedBroadcast.getContentDetails()
           .getBoundStreamId());
    
       LiveStreamList returnedList = liveStreamRequest.execute();
       List<LiveStream> liveStreams = returnedList.getItems();
       if (liveStreams != null && liveStreams.size() > 0) {
        LiveStream liveStream = liveStreams.get(0);
    
        while (!liveStream.getStatus().getStreamStatus()
          .equals("active")) {
         Thread.sleep(5000);
         returnedList = liveStreamRequest.execute();
         liveStreams = returnedList.getItems();
         liveStream = liveStreams.get(0);
        }
        //the broadcast cann't transition the status from ready to live directly,
        //it must change to testing first and then live.
        YouTube.LiveBroadcasts.Transition broadCastRequest = youtube
          .liveBroadcasts().transition("testing",
            returnedBroadcast.getId(), "id,contentDetails,status");
    
        LiveBroadcast liveBroadCast = broadCastRequest.execute();
        String youTubeLink = "https://www.youtube.com/watch?v="+liveBroadCast.getId();
        System.out.println("youTubeLink:"+youTubeLink);
        System.out.println("Broad EmbedHtml:"+liveBroadCast.getContentDetails().getMonitorStream().getEmbedHtml());
        System.out.println("Broad Cast Status:"+liveBroadCast.getStatus().getLifeCycleStatus());
       }
    
    這裡再提示一點,要可以看到broadcast的內容,必須在broadcast的status為testinglive的時候,因此程式碼透過YouTube.LiveBroadcasts.Transition 去改變broadcast物件的狀態為testing,就是表示我們要開始測試這各廣播電台的stream通道是否有正常收到訊號;當testing沒問題時,要正式讓所有人都可以在youtube上看到我們的live broadcast內容時,只需再將broadcast的狀態改為live即可,我這邊的程式碼並沒有包含將狀態改為live,請各位自行動手實作。
    下面附上狀態改變完,接收到的broadcast結果:
    ================== Returned Bound Broadcast ==================

      - Broadcast Id: NqtWlfFOQb8
      - Bound Stream Id: h5jJg5xHAzn4jSSf46IGcA1412670820085418
    youTubeLink:https://www.youtube.com/watch?v=NqtWlfFOQb8 => 產生出來可在youtube上看live 轉播的網址
    Broad EmbedHtml:<iframe width="425" height="344" src="http://www.youtube.com/embed/NqtWlfFOQb8?autoplay=1&livemonitor=1" frameborder="0" allowfullscreen></iframe> => 若要嵌入至某個網頁,則使用此html語法
    Broad Cast Status:testStarting

    最後附上一些參考的文件或網站,若還是有問題都可以多方參考,畢竟本人又是第一次做這個功能,一定有許多未發現的功能等著大家自行去探索!

    我研究旅途的起點,看一些基本觀念跟追蹤資訊的入口

    Streaming to YouTube Live? Put an API on it!

    重要的API參考入口網址,裡面有"try  it"的地方都可以試著去執行他,經過這個階段可以更了解該API各參數的功用以及回傳的結果

    了解Broadcast的生命週期,就更清楚如何去建立、控制Broadcast、改變Broadcast的狀態

    live Encoder 的設定參數

    若使用node.js的人,可以參考此篇實作

    2014年8月6日 星期三

    AXIS2-利用WSDL產生Client 端Stub 物件

    1.先建立一個Dynamic Web Project,我的名稱為TestClientStub
    2.在工具列上的Windows->Preference->Web Services-> Axis2 Preferences內,選擇自己Axis2的儲存位置

    3.在專案名稱上選右鍵->New->Other 出現如下畫面,選擇 Web Service Client 後按下Next

    3.在Service definition中選擇或輸入一個有WSDL的URL,我這邊輸入一個我已經架設好的Web Service 的URL: http://192.168.1.xxx/Test/services/APServiceService?wsdl ,後面的wsdl一定要有,否則無法讀取到WSDL定義檔; 選完後點選 Server runtime: Tomcat v6.0 Server,準備設定 Server runtime及Web service runtime


    4.此步驟是要設定Client端的環境,因此基本上就是按照各位環境所安裝的Web Server及Web Service Runtime選擇就可以,我這邊client端的環境:Web Server是Tomcat 6.0 ,service runtime當然就是選Apache Axis2,確定選擇沒錯就可以按下OK->Next

    5.接下來這個畫面顯示的項目基本上都不需要改變,Service Name是自動產生出來的stub名稱,Customer package name 為stub產生的目的package,而底下的Client mode是指定產生出來的stub在呼叫Web Service時所提供的method類型,按順序為:
    1.產生一個支援同步與非同步的client code
    2.僅產生同步的client code
    3.僅產生非同步的client code
    同步(Block)與非同步(Non-Block)的主要差別就在於: 同步是一個client端請求Web Service的服務後,必須等到目前執行的請求完成後,client才能再繼續請求下一個Web Service服務,非同步則不需要像同步等待前一個請求執行完成,即可以再發出下一個請求。


    6.按下Finish後,自動產生的Client Stub如下,同時大家也可以看到Eclipse也自動幫我們把需要的jar檔都產生在WEB-INF/lib下了

    7.這樣就可以利用自動產生出來的APServiceServiceStub來調用Web Service了

    參考資料
    http://blog.csdn.net/lifetragedy/article/details/7776907
    http://axis.apache.org/axis2/java/core/api/org/apache/axis2/client/async/AxisCallback.html

    2014年6月12日 星期四

    Hibernate Tool安裝、自動產生hibernate.cfg.xml檔及對應的Entity

    1.請到Help->Eclipse Marketplace,在Find內打 Hibernate tool後-> Go,出現如下畫面:


    這裡我是安裝Hibernate Tools(Indigo),按下install,Next到底就會開始安裝。
    2.安裝完成後請重新啟動Eclipse再開始使用
    3.這裡要示範的是新增一個連線到MySQL的hibernate.cfg.xml,請從選單的
    File > New > 選取 Other ,出現如下畫面 後,選擇第一個,按Next

    4.在下面的畫面只要選擇你要存放hibernate.cfg.xml的路徑即可,基本上檔名是不用改的,按下Next

    5.填入基本的連線資訊,依序填入如下圖,若DB的Driver Class若找不到適合的driver,表示你還沒有將適合的DB driver套件裝至你的專案中,請先下載,我使用的MySQL Driver套件是mysql-connector-java,填完直接按下Finish,你會看到你的src目錄底下已經有個hibernate.cfg.xml檔案


    6.連線DB的基本設定檔已經有了,接下來要告訴hibernate工具有哪些table要轉成Entity,這要依靠 hibernate.reveng.xml 這個檔案,產生它的方式跟產生hibernate.cfg.xml的方式其實很像,一樣從File > New > 選取Other後,出現如下圖的選單選擇 Hibernate Reverse Engineering File (reveng.xml),按下Next

    7.同樣地,指定Hibernate reverse檔要存在哪裡,這裡我就先指定在src底下,按下Next

    8.接下來這步驟比較稍微繁瑣一點,條列如下:
    1. 選定Console configuration,記得我們在Step.5有特別用紅框框起來的地方嗎,那邊勾選的create console configuration就是為了在這邊使用,若Step.5 沒有勾選create console configuration ,在這邊的Console configuration 就沒得選。
    2. 按下左下方的Refresh,正常情況下會顯示出你連線DB的DB Name以及裡面的table在Data Schema這個區塊,若出現錯誤,則可能造成錯誤的情況很多,可能是DB 的使用者帳號或密碼輸入錯誤,或是任何連線至DB的基本資訊錯誤,檢查一下hibernate.cfg.xml檔案內容,是否有填錯,然後請記得別使用sa帳號作為連線登入帳號這是不被允許若使用sa帳號只會得到無法連線的錯誤訊息!
    3. 假設一切順利,那麼大家可以從Database schema那邊看到你的DB 名稱,以及底下的Table(這邊就容許小弟打個馬賽克,那對大家來說不是重點XD)。選定要轉成Entity的table後,按下中間的Include即可,若要移除請按Exclude,最後都確認就按下Finish吧!

    9.最後準備產生Entity,從選單的Run >  Hibernate Code Generation > 選取 Hiberate Code Generation Configurations 選項

    10. 基本上到這邊已經不太需要做甚麼變動,真的比較會變動的,可能是Package那個欄位,此欄位可以設定自動產生的entity 要存放到哪個package目錄下,改完直接按下Run,趕快去你指定的目錄看看自動產生出來的Entity檔案吧!

    2014年5月26日 星期一

    Quartz工作排程工具介紹(一)-簡單整合進Tomcat

    因為工作上的需要,第一次接觸Quartz,這裡就先來簡單介紹一下我對Quartz近期的學習使用心得,以下內容若有任何錯誤,也請不吝指教,畢竟是第一次接觸,可能還有許多地方學習不足。
    Quartz是一個Open Source 的工作排程(job schedule) library或稱框架,它讓我們更容易的去安排、管理多個job(可以是幾個而已,也可能成千上萬個)的執行時間,以及怎麼執行(多久執行一次)等。名詞解釋不用說太多,趕快進入正題,該怎麼開始使用它來進行工作排程,接下來的說明是以整合進Web Application為主,我使用的Web Server是Tomcat 7.0。
    1. 先至Quartz的官網 下載最新的Jar檔,目前最新的版本為Quartz 2.2.1,下載下來請將lib底下的jar檔複製到WEB-INF/lib底下,我的2.2.1版分別有以下這些jar檔: 
      1. quartz-2.2.1
      2. quartz-jobs-2.2.1
      3. slf4j-api-1.6.6
      4. slf4j-log4j12-1.6.6
      5. c3p0-0.9.1.1
    2. 在Web.xml內加入如下的listener設定:
      <listener>
         <listener-class>     
           org.quartz.ee.servlet.QuartzInitializerListener     
         </listener-class>
      </listener>
      
    3. 在src根目錄下新增一個quartz.properties檔案,用來設定排程器(scheduler)的一些參數,我的設定檔內容簡單如下(這邊盡量先以最簡單的方式完成設定):
      <!--當程式中有多個scheduler時,用來區別不同scheduler  -->
      org.quartz.scheduler.instanceName = MyScheduler
      <!--同一時間能夠並行執行的job個數,規定是只要正的整數值,但一般是限定在1~100  -->
      org.quartz.threadPool.threadCount = 5
      <!--設定儲存scheduling資訊(job,triggers,calendars)的位置,這邊就如一般設定儲存在記憶體中  -->
      org.quartz.jobStore.class = org.quartz.simpl.RAMJobStore
      # ----------------------------- Plugins --------------------------- #
      <!--Quartz並沒有內建的logging實作,所以務必指定幫我們執行log的class -->
      org.quartz.plugin.triggerHistory.class=org.quartz.plugins.history.LoggingTriggerHistoryPlugin
      <!-- Trigger在fire(發起)job執行時,要顯示的log資訊內容及格式 -->
      org.quartz.plugin.triggerHistory.triggerFiredMessage=Trigger [{1}.{0}] fired job [{6}.{5}] scheduled at: {2, date, dd-MM-yyyy HH:mm:ss.SSS}, next scheduled at: {3, date, dd-MM-yyyy HH:mm:ss.SSS}
      <!-- Trigger在job完成執行時,要顯示的log資訊內容及格式 -->
      org.quartz.plugin.triggerHistory.triggerCompleteMessage=Trigger {1}.{0} completed firing job {6}.{5} at {4, date, yyyy-MM-dd HH:mm:ss.SSS} with resulting trigger instruction code: {9}. Next scheduled at: {3, date, dd-MM-yyyy HH:mm:ss.SSS}  
      <!-- Trigger在fire(發起)job執行卻misFire時,要顯示的log資訊內容及格式 -->
      org.quartz.plugin.triggerHistory.triggerMisfiredMessage=Trigger {1}.{0} misfired job {6}.{5} at: {4, date, yyyy/MM/dd HH:mm:ss }. Should have fired at: {3, date,yyyy/MM/dd HH:mm:ss} 
      <!--此plugin 會從預設檔名為quartz_data.xml的設定檔讀取jobs和triggers設定並加至scheduler中 -->
      org.quartz.plugin.jobInitializer.class=org.quartz.plugins.xml.XMLSchedulingDataProcessorPlugin
    4. 寫一個自己的job class,此class必須實作org.quartz.Job 這個interface,我的code如下:
      package com.xxx.util.Quartz.job;
      
      import java.text.SimpleDateFormat;
      import java.util.Calendar;
      import java.util.Date;
      
      import org.quartz.DisallowConcurrentExecution;
      import org.quartz.Job;
      import org.quartz.JobExecutionContext;
      import org.quartz.JobExecutionException;
      
      @DisallowConcurrentExecution
      public class TestJob2 implements Job{
      
      public void execute(JobExecutionContext arg0) throws JobExecutionException {
        Calendar expectedDateTime=Calendar.getInstance();
        expectedDateTime.add(Calendar.MILLISECOND, 5000);
        Long expectedExecuteTime= expectedDateTime.getTimeInMillis();
        Date date=new Date();
        
        while (expectedExecuteTime!=date.getTime() && expectedExecuteTime > date.getTime())
        {
         
         long leftMilliSecond = expectedExecuteTime-date.getTime();
         System.out.println("Thread name:"+Thread.currentThread().getName()+ "\n There is still have "+leftMilliSecond/1000.0 +" seconds");
         
         try {
          Thread.sleep(1000);
         } catch (InterruptedException e) {
          // TODO Auto-generated catch block
          e.printStackTrace();
         }
         date=new Date();
        }
        SimpleDateFormat sdf=new SimpleDateFormat("yyyy/MM/dd HH:mm:ss");
        System.out.println("I am job2 ,It's "+sdf.format(new Date()));
       }
      }
    5. 最後,新增一個quartz_data.xml(預設檔名)放在src根目錄下,內容如下:
      <job-scheduling-data version="1.8" xmlns:xsi="http://www.w3.org/2001/XMLSchema-instance" xmlns="http://www.quartz-scheduler.org/xml/JobSchedulingData" xsi:schemalocation="http://www.quartz-scheduler.org/xml/JobSchedulingData http://www.quartz-scheduler.org/xml/job_scheduling_data_1_8.xsd">
        
         <schedule>
              <job>
                  <name>TestJob</name>
                  <job-class>com.xxx.util.Quartz.job.TestJob2</job-class>
              </job>
              <trigger>
                  <cron>
                      <name>CronTestJob</name>
                      <job-name>TestJob</job-name>
                      <cron-expression>0/5 * * * * ?</cron-expression>
                  </cron>
              </trigger>
          </schedule>
      
      </job-scheduling-data>
      
      此設定是安排job每五秒執行一次,cron-expression請參考 cron-expression1cron-expression詳細說明
    完成以上五個步驟後,即可以啟動你的tomcat,看看job是否按照排程設定在正確的時間執行!

    PS:下面列出兩個對大家可能有用的參考網址
    1.Quartz 官網內的Configuration Reference,裏頭按照不同主題將configuration做詳細的分類說明
    2.Quartz 2.2.1 API

    2014年3月24日 星期一

    Html跳脫字元處理(Escape Html)&XSS攻擊

    特殊字元在Html的顯示處理會衍生出的相關問題常有:
    1.Html頁面能不能正常的運作:此種情況通常是因為要在html中呈現的屬性值中含有特殊字元像是單引號(')、雙引號(")等,以Jsp的程式範例來說,我們可能會寫一段javascript如下:

    var memo='${memo}'
    
    假設${memo}的內容為'test,則整串javascript會變成var memo =''test' ,變成一句無效的javascript敘述,因前面兩個單引號已經表示字串的內容結尾,後面的test'即成為無效的敘述 ; 因此一定要養成良好的寫作習慣,要將Server端資料輸出到前端時,無論資料內容為何,還是盡量使用JSTL(<c:out value='${memo}' /> 或<bean:write ..>等有針對特殊字元的輸出做處理的 Tag函式庫,避免直接使用<%= %>或是${}等方式直接輸出。


    2.Cross-Site Scripting(XSS) 跨網站指令稿攻擊:此種攻擊方式是利用網站未對
    使用者輸入的內容加以過濾驗證處理,便將可能有攻擊性的Scripting在其他使用者的瀏覽器上
    顯示執行,造成危害。例如將此串Scripting <script>alert('attack')</script>輸入在某個可供查詢輸入的文字方塊,一般來說,網站都會將使用者的查詢條件紀錄下來並隨同查詢結果一併再次顯示在回應的網頁上,若顯示查詢結果時,同時也執行了上面那段script,那麼即表示該頁面的輸出沒有針對特殊字元做輸出的處理。
    如左圖即為在我自行製作的網頁的文字方塊內輸入上面那段script,再傳到server端後並沒有做任何特殊字元的過濾處理,而在顯示時也不使用任何有跳脫特殊字元的tag(如<c:out value='xxx' />),直接將那段script又原封不動的輸出在原html的文字方塊內,即產生被scripting 攻擊的效果。


    我的前端頁面很單純,只是將該查詢的輸入內容再次從server端取得後並呈現在頁面上如下:
    $(document).ready(function() {
             $(".searchWrapper").find("#keyword").val('${keyword}');
    }
    
    比較正確的做法應該是將'${keyword}'此段輸出改為<c:out value="${keyword}">,即可避免此種XSS的潛在危險。

    當然以這個例子來說,實際上是危害不到任何人,只是提供一個會產生潛在XSS風險的寫法來做示範,若真的要有可能危害到其他瀏覽同一頁面的使用者,一般還是得將有風險的scripting輸入存入DB後,當其他使用者又瀏覽相同頁面時,再將該scripting輸出並執行,此種風險通常就存在可讓人輸入意見的論壇,若沒有針對特殊字元做過濾,則很容易在瀏覽其他人所留下的意見資訊時,被做XSS攻擊。


    PS:
    1.順帶一提,若要使用org.apache.commons.lang3的StringEscapeUtils來自行在後端escape特殊字元
    ,個人遇到的情況是當使用StringEscapeUtils.escapeHtml4及StringEscapeUtils.escapeHtml3都沒有針對單引號做escape,因此就自行寫了一個EscapeUtil並繼承StringEscapeUtils,並針對escapeHtml4未對單引號做escape的部分做補強,程式碼如下:
    public class EscapeUtil extends StringEscapeUtils {
      /***
       * this method is to enhance  StringEscapeUtils.escapeHtml4' method,
       * StringEscapeUtils.escapeHtml4 doesn't escape "'" .
       * @param input
       * @return
       */
      public static String escapeHtml(String input){
       String escapeText= StringEscapeUtils.escapeHtml4(input);
       escapeText=escapeText.replaceAll("\'", "&#039;");
       return escapeText;
       
      }
    }
    
    附上StringEscapeUtils API參考網頁
    2.XSS參考網站